Omron / Sentech EE Photomicrosensor (Micro Sensors series)
EE-SX670
The Omron EE Micro Sensors series comprises ultra-small photoelectric photomicrosensors, with the EE-SX670/671 slot type being the representative non-modulated through-beam model offering a 5 mm slot/sensing distance and an infrared LED emitter. It operates on 5 to 24 V DC with an NPN open-collector output (PNP variants also available), selectable Light-ON/Dark-ON operation, and a fast response time down to 0.17 ms (response frequency up to 1 kHz). The PBT-housed device connects via a system connector or pre-wired cable, weighs only a few grams, and is rated IP50 over a -25 to +55 C operating range. It is a discrete switching position/edge sensor rather than an imaging or measurement device.
Brand
Omron / Sentech
Sensor type
Photoelectric (slot-type photomicrosensor)
Sensing method
Through-beam (slot type)
Light source
Infrared LED
Range / distance
5 mm slot width / sensing distance
Response time
1 ms (response frequency 1 kHz max, 3 kHz typ)
Switching frequency
Up to 1 kHz (1000 Hz)
Output type
NPN open collector (PNP variants available), 100 mA max
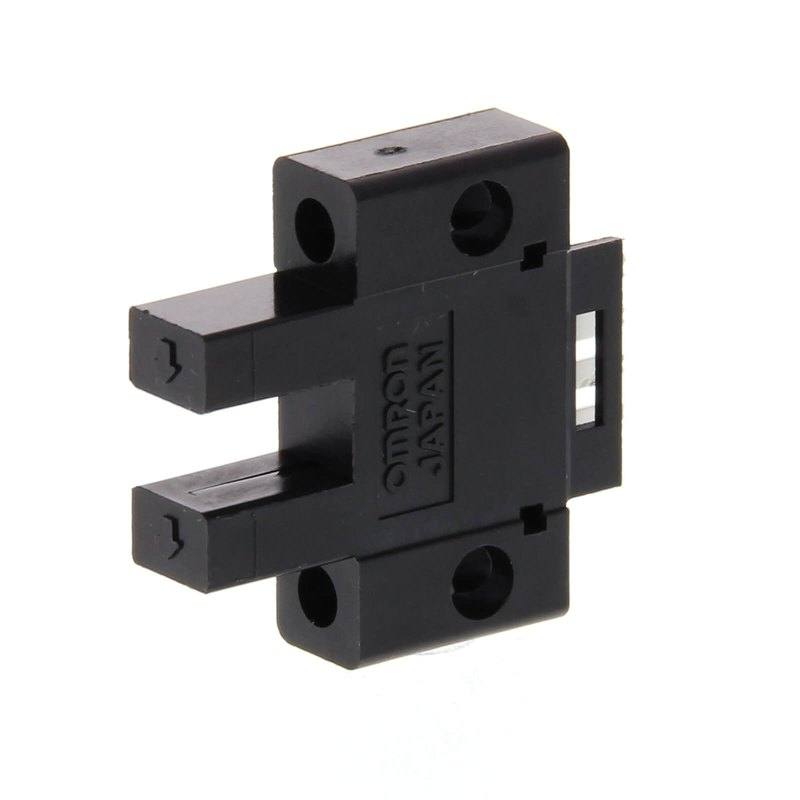
The Omron EE-SX670 is a slot-type through-beam photomicrosensor, meaning the infrared LED emitter and its receiver face each other across a fixed 5 mm gap built into a single U-shaped body. Anything that passes into that 5 mm slot and breaks the beam is detected, so unlike a diffuse or retro-reflective sensor there is no reflectivity, color or surface-finish dependence to tune. The sensing distance equals the slot width, which makes alignment a non-issue: the factory has already aligned emitter and receiver, and detection is purely a function of an object (or an opaque flag, edge or gear tooth) entering the gap. The infrared light source and through-beam geometry give consistent, high-contrast switching on small parts and thin edges that diffuse sensors would struggle to resolve.
Electrically this is a discrete switching device, not a measurement or imaging one. It runs on a wide 5 to 24 V DC rail and provides an NPN open-collector output rated to 100 mA (PNP variants are available), with selectable Light-ON / Dark-ON operation so you choose whether the controller sees a signal when the beam is clear or when it is blocked. The headline timing figure is the fast response (down to roughly 0.17 ms region, with a 1 kHz response frequency), which is what lets it act as a clean position or edge trigger for fast-moving mechanisms. Because the output is open-collector, it wires directly into a PLC input card, counter, or a vision system's hardware trigger line; you simply provide the pull-up appropriate to your input logic.
Physically the device is tiny and built for tight machine positions: a PBT resin housing measuring about 25.4 x 22.2 x 6.95 mm and weighing only 2.4 to 3.0 grams, connected through a system connector or pre-wired cable. The IP50 rating and -25 to +55 C operating range place it firmly inside enclosed equipment and dry indoor automation rather than washdown or outdoor duty. In a machine-vision context its job is rarely to inspect anything itself; it is the timing and positioning element that tells the camera or controller exactly when a part has reached a station, when an index has occurred, or when a web edge has passed, so the imaging system fires at the right instant.
Best for
Detecting the leading or trailing edge of small parts as they pass a station, used as a hardware trigger to fire an inspection camera at the correct instant
Index, home and end-of-travel position sensing on compact mechanisms where an opaque flag passes through the 5 mm slot
Counting and presence detection of small components on feeders, escapements and pick-and-place stations in electronics assembly
Edge and gap detection on packaging lines (label, flap or web edge) to time downstream operations
Slot-based encoder-style pulse pickup from a slotted disk or comb for low-resolution position or rotation counting up to the 1 kHz response limit
Selection notes
The 5 mm gap is fixed and equals the sensing distance: the object or flag you want to detect must physically pass through that slot, so it suits thin, small or precisely guided parts rather than large or loosely positioned objects.
Confirm your controller's input logic before ordering: this model is NPN open-collector (sinking), and a PNP (sourcing) variant exists, so match the polarity to the PLC or vision trigger card and provide the correct pull-up.
Use the selectable Light-ON / Dark-ON setting to define the active state, then verify that the 1 kHz response frequency (sub-millisecond response) comfortably exceeds your fastest part-passing rate to avoid missed edges.
IP50 and a PBT resin housing mean this is for clean, dry, enclosed machine interiors; it is not intended for washdown, coolant-spray, or wet/dusty environments without additional protection.
Plan the mechanical mounting and 5 to 24 V DC supply early: the body is only a few grams and a few millimeters thick, so it integrates into tight assemblies, but the slot must stay clear and the flag path must be repeatable for reliable triggering.
Specifications: General
Brand
Omron / Sentech
Sensor type
Photoelectric (slot-type photomicrosensor)
Specifications: Performance
Range / distance
5 mm slot width / sensing distance
Response time
1 ms (response frequency 1 kHz max, 3 kHz typ)
Switching frequency
Up to 1 kHz (1000 Hz)
Specifications: Interface
Connection
System connector or pre-wired cable
Specifications: Electrical
Supply voltage
5 to 24 V DC
Specifications: Environment
Operating temperature
-25 to +55 C
IP rating
IP50
Specifications: Sensing
Sensing method
Through-beam (slot type)
Light source
Infrared LED
Specifications: Output
Output type
NPN open collector (PNP variants available), 100 mA max
Specifications: Mechanical
Housing material
PBT resin
Dimensions
25.4 x 22.2 x 6.95 mm (EE-SX670, W x H x D)
Weight
Approx. 2.4-3.0 g
Applications this camera is commonly selected for. Open one to see the full recommended hardware and approach.
These steps take an Omron Sentech (STC) camera from the box to a stable first image and on to your own application. They apply across the GigE Vision, USB3 Vision and CoaXPress STC families; the interface only changes how you cable and power the camera.
Download and install the Sentech SDK on the host PC. The package provides StViewer, the viewing and configuration software you use to bring the camera up, and StApi, the programming SDK you integrate later. Because the cameras are GenICam/GenTL-compliant, StApi also registers a GenTL producer, so any GenICam-compliant third-party vision software can discover and drive the camera as an alternative front end.
2. Cable, power and connect the camera
Connect according to the interface. GigE Vision: link to a Gigabit NIC (use PoE or the separate power input) and put the camera and host on the same subnet; for USB3 Vision use a USB 3.x port and a certified cable; for CoaXPress (STC) connect to a CoaXPress frame grabber, which also supplies Power-over-Coax. Then open StViewer and let it enumerate the camera. If a GigE camera does not appear, check the IP configuration and firewall, and on USB3 confirm the host bandwidth and driver.
3. Configure exposure, gain and white balance
Open the device in StViewer and start a live stream. Set exposure and gain for a well-exposed, low-noise image: raise exposure first and only add gain when more light or a faster shutter is not an option, keeping exposure short enough to freeze motion on global-shutter models. On colour cameras, run white balance under your actual production lighting. Adjust the lens aperture and focus on a representative target before tuning anything else.
4. Set the trigger and grab a first image
Start in free-run (continuous) acquisition to confirm a clean, stable image. For inline inspection switch to hardware or software triggering: select the trigger source, set the active edge and any delay, and wire the strobe or illumination to the camera's I/O so lighting fires with each exposure. Acquire and save a frame in StViewer; this saved image is your reference for the SDK stage and for downstream inspection.
5. Move to the StApi SDK (or any GenICam software)
Once the image is stable, reproduce the same settings in code. Use StApi to open the device, apply the GenICam features you validated in StViewer (exposure, gain, trigger, pixel format) and grab frames into your application via the bundled C++, C, C#/.NET or Python interfaces; the included samples are the fastest starting point. Prefer a different stack? The same GenICam/GenTL camera works with third-party vision libraries. With a reliable feed, you can route it into a deep-learning inspection such as Rosepetal for AI-based defect detection.
Frequently asked questions
It is a discrete switching photomicrosensor, not an imaging or measurement device. It outputs a simple on/off switching signal when an object enters or leaves the 5 mm slot, so it detects presence, position or edges rather than measuring dimensions or capturing images.
It is a through-beam slot type, so the sensing distance equals the 5 mm slot width and the emitter and receiver are pre-aligned across that gap from the factory. Detection happens when an object passes into the 5 mm slot and breaks the infrared beam; there is no separate alignment of two units.
It runs on 5 to 24 V DC and provides an NPN open-collector output rated up to 100 mA, with selectable Light-ON or Dark-ON operation. That output wires directly to a PLC input or a vision system's hardware trigger line. A PNP variant is also available if you need a sourcing output.
It has a response frequency up to 1 kHz (1000 Hz) with a response time in the sub-millisecond range (around 0.17 ms), which makes it suitable as a precise edge or position trigger on fast-moving mechanisms.
No. It is rated IP50 with a PBT resin housing and a -25 to +55 C operating range, so it is intended for clean, dry, enclosed machine interiors and indoor automation, not washdown, coolant or outdoor use.